
The rear window on a 2000 BMW Z3 is an integral part of the convertible top, providing protection from the elements and enhancing the overall aesthetic of the vehicle. However, over time, the window may become damaged or begin to show signs of wear and tear. If this is the case, it is important to replace the rear window to maintain the original integrity and functionality of the convertible top.
In this step-by-step guide, we will walk you through the process of replacing the rear window on a 2000 BMW Z3. Whether you are a seasoned DIY enthusiast or a novice in car repairs, our detailed instructions and helpful tips will ensure that you can successfully complete this project.
Before you begin, gather all the necessary tools and materials. This will include a replacement rear window specific to your BMW Z3 model, a sharp utility knife, a heat gun or hairdryer, a plastic scraper, a cleaning solution, and a microfiber cloth. Additionally, ensure that you have a clean and well-ventilated workspace, as working with adhesives and heating tools may produce fumes.
Follow each step carefully and take your time to avoid any mishaps. Remember to exercise caution when working with sharp tools and apply consistent pressure when removing the old rear window. With a little patience and attention to detail, you can successfully replace the rear window on your 2000 BMW Z3, restoring its beauty and functionality.
Understanding the Importance of a Rear Window
The rear window of a car is an essential component that plays a significant role in the overall functionality and safety of the vehicle. It provides several crucial functions that are essential for a comfortable and secure driving experience. Understanding the importance of a rear window is vital for any car owner to ensure proper maintenance and timely replacement.
1. Visibility
The rear window allows the driver to have a clear view of the road behind them. It helps in monitoring traffic, pedestrians, and any potential obstacles while driving in reverse or changing lanes. Proper visibility through the rear window is crucial for safe driving, as it enables the driver to react quickly and make informed decisions on the road.
2. Safety
The rear window also plays a significant role in ensuring the safety of the vehicle and its occupants. It provides a clear line of sight for the driver, allowing them to watch out for any hazards or approaching vehicles. In case of an emergency or accidents, the rear window acts as an escape route for the passengers, providing an additional exit option if the door is inaccessible.
In addition to visibility and safety, the rear window also helps in maintaining the structural integrity of the car. It contributes to the overall design and aerodynamics of the vehicle and helps in reducing drag, enhancing fuel efficiency, and improving the overall driving experience.
It is crucial to maintain the rear window of a car in good condition to enjoy its benefits fully. Regular cleaning, avoiding rough handling, and immediate replacement in case of damage are essential steps that should be taken to ensure the proper functioning of the rear window.
Conclusion:
The rear window of a car is not just a transparent panel but an integral part of the vehicle’s functionality and safety. Understanding its importance and taking necessary maintenance steps can help car owners enjoy a comfortable and secure driving experience. Timely replacement of a damaged rear window is crucial to ensure optimal visibility, safety, and overall performance of the vehicle.
Signs that Indicate the Need for Rear Window Replacement
If you own a 2000 BMW Z3 and start noticing any of the following signs, it may be time to consider a rear window replacement:
- Cracks or chips: Any visible cracks or chips on the rear window can compromise its structural integrity and increase the risk of further damage.
- Leakage: If you find water seeping into your car’s interior through the rear window, it indicates a faulty seal or a damaged window that needs replacement.
- Foggy or hazy appearance: A foggy or hazy appearance on the rear window can be a sign of a damaged or worn-out defrosting system. A replacement may be necessary to ensure optimum visibility.
- Difficulty in opening or closing the window: If you experience any issues when operating the rear window, such as sticking, jamming, or resistance, it could be a sign of internal damage that requires replacement.
- Noise or wind drafts: Unusual noise or wind drafts coming from the rear window area might indicate a loose or damaged seal, which can be resolved through replacement.
It is essential to address these signs promptly to avoid further complications, such as water damage, decreased visibility, or potential safety hazards. By replacing the rear window in a timely manner, you can ensure the integrity and functionality of your vehicle’s rear window system.
Gathering the Necessary Tools and Materials
Before you begin replacing the rear window on your 2000 BMW Z3, it’s important to gather all the necessary tools and materials to ensure a smooth and successful process. Here’s a list of what you’ll need:
Tools:
- Trim removal tools
- Ratchet set
- Socket set
- Pliers
- Screwdriver set
- Tape measure
- Heat gun or hairdryer
- Gloves
Materials:
- Replacement rear window
- Replacement window gasket
- Glass cleaner
- Adhesive remover
- Weatherstripping adhesive
- Lint-free cloth or towel
- Protective goggles
Make sure to gather all these tools and materials before starting the rear window replacement process. Having everything readily available will save you time and ensure that the job is done correctly.
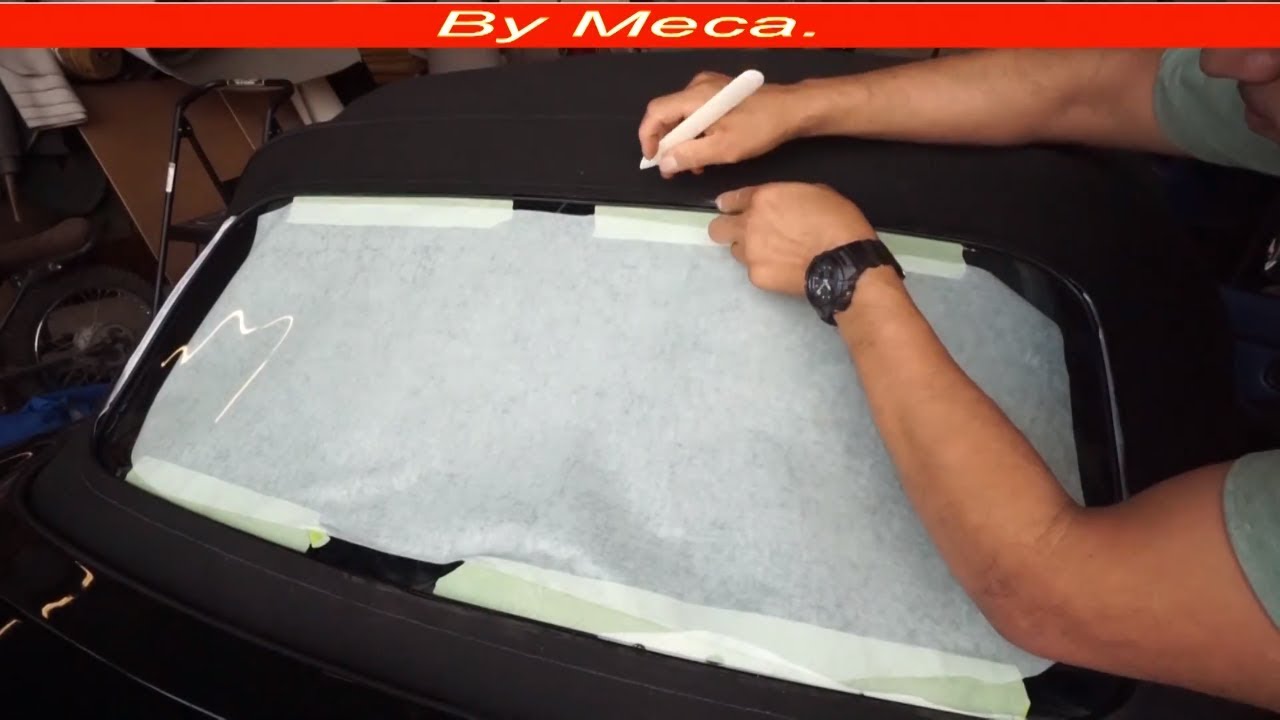
Removing the Old Rear Window
Before starting the process of replacing the rear window on your 2000 BMW Z3, you’ll need to remove the old one. Follow these step-by-step instructions to safely remove the old rear window:
- Step 1: Carefully lower the top of your BMW Z3 to access the rear window.
- Step 2: Begin by removing any exterior molding or trim around the rear window. This may include weather stripping or clips. Use a trim removal tool or a flathead screwdriver to gently pry the molding away from the window.
- Step 3: Once the molding is removed, carefully remove any adhesive or sealant that may be holding the window in place. This can be done using a plastic scraper or a specialized adhesive remover. Take care not to scratch the window or the body of the car.
- Step 4: With the adhesive or sealant removed, gently push on the rear window from the inside of the car to pop it out of its frame. Be cautious here, as the window may be fragile and can easily break.
- Step 5: Once the window is loose, carefully remove it from the frame. Take care not to damage any electrical wiring or sensors that may be attached to the window.
- Step 6: Inspect the window frame for any remaining adhesive or sealant. Remove any traces using the plastic scraper or adhesive remover.
Important Tips:
- Be patient and take your time when removing the old rear window. Rushing the process could result in damage to the window or the car.
- If the window is stuck and does not want to come out, try gently heating the adhesive or sealant using a heat gun or hairdryer. This can help to loosen the bond and make removal easier.
Once the old rear window is successfully removed, you can proceed with the installation of the new window. Refer to the next section for step-by-step instructions on how to install the new rear window on your 2000 BMW Z3.
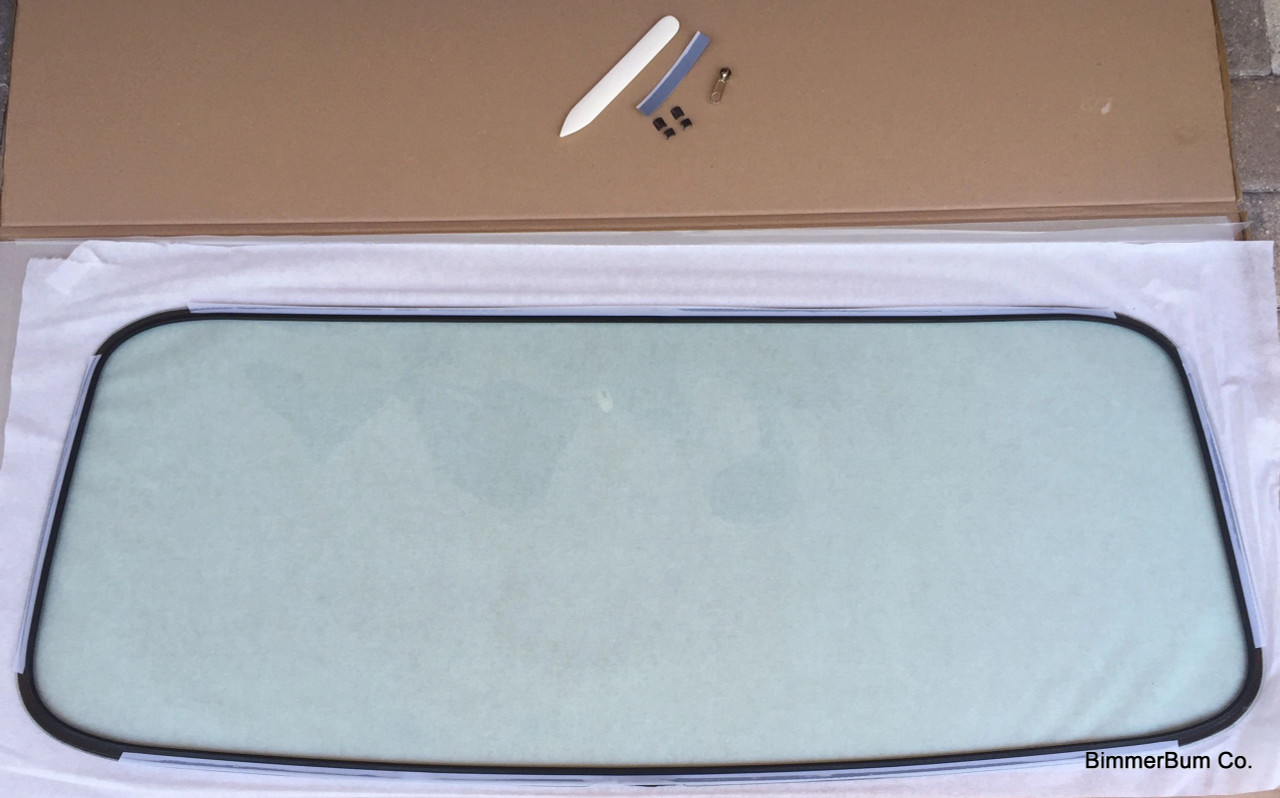
Preparing the New Rear Window
Before installing the new rear window on your BMW Z3, it’s important to properly prepare it to ensure a seamless installation. Follow these steps to get the new rear window ready:
Step 1: Inspect the new window
Carefully examine the new rear window to ensure there are no scratches, cracks, or any other defects. If you notice any, contact the manufacturer or supplier to get a replacement window.
Step 2: Clean the new window
Using a gentle glass cleaner and a clean, lint-free cloth, thoroughly clean both sides of the new rear window. Make sure to remove any dirt, dust, or fingerprints. This will ensure a clearer view and a better overall appearance.
Step 3: Apply a window treatment (optional)
Applying a window treatment can help protect the new rear window and prolong its lifespan. There are various treatments available, such as UV protectant sprays or films. Follow the manufacturer’s instructions for proper application.
Step 4: Check for proper fit
Before proceeding with the installation, check if the new rear window fits properly into the frame of your BMW Z3. Make sure there are no gaps or misalignments. If needed, adjust the window or seek professional assistance.
By properly preparing the new rear window, you’ll ensure a smooth installation process and enjoy a clear, undisturbed view while driving your BMW Z3. Take your time to complete these preparatory steps before moving on to the installation process.
Installing the New Rear Window
After successfully removing the old rear window, it is time to install the new one. Follow the steps below to complete the installation process:
- Clean the surrounding area of the window frame thoroughly using a mild soap and water solution. Make sure there is no dirt or debris left.
- If the new rear window came with an adhesive or sealant, apply it to the window frame according to the manufacturer’s instructions. Ensure an even and consistent application.
- Carefully position the new rear window onto the window frame, making sure it aligns properly with the frame and any pre-existing holes or attachment points.
- Apply gentle pressure to the window, starting from one corner and working your way around until the entire window is securely in place. Be cautious not to apply too much pressure to avoid damaging the window or frame.
- If there are any clips or fasteners included with the new window, attach them at their designated locations on the frame to further secure the window.
- Inspect the window from the outside to ensure that it is properly seated and aligned. Make any necessary adjustments if needed.
- Allow the adhesive or sealant to cure according to the manufacturer’s instructions before operating the window or exposing it to water or harsh weather conditions.
- Once the adhesive or sealant is fully cured, test the window to ensure proper functionality. Open and close it several times to confirm that it operates smoothly.
- Finally, clean the new rear window using a window cleaner or mild soap and water solution. Dry it thoroughly with a clean, lint-free cloth.
Following these steps carefully will ensure a proper and successful installation of the new rear window in your 2000 BMW Z3. Take your time and exercise caution during the process to avoid any damages or mishaps.
Testing the Newly Installed Rear Window
After successfully installing the new rear window on your 2000 BMW Z3, it is crucial to test its functionality and ensure that it fits properly. Follow these steps to perform a thorough test:
1. Check for any leaks
Use a hose or a bucket of water to simulate rain conditions. Thoroughly wet the exterior of the rear window and observe the interior for any signs of water leakage. If you notice any water coming through, there might be a problem with the installation or the window itself.
2. Inspect the window’s sealing
Examine the edges of the newly installed rear window for any gaps or irregularities in the sealing. Pay close attention to the corners and the area where the window meets the convertible top. If you spot any issues, it may be necessary to adjust the window or reapply the sealing materials.
3. Test the window defogger
Turn on the rear window defogger and observe if the lines on the window become warm. Touch the window carefully to ensure heat is being generated evenly across the surface. If the defogger does not work or the heat distribution is uneven, there might be a problem with the electrical connections or the defogger lines.
Note: If you replaced the rear window yourself, it is essential to double-check your work and ensure that all connections, seals, and components are properly secured and functioning. If you are unsure about any aspect of the installation, consult a professional.
By following these testing steps, you can ensure that your newly installed rear window on your 2000 BMW Z3 is working correctly and providing the necessary functionality, such as keeping the interior dry and maintaining visibility.
Maintenance Tips for the New Rear Window
Once you have successfully replaced the rear window of your 2000 BMW Z3, it is important to properly maintain it to ensure its longevity and continued functionality. Here are some maintenance tips to keep in mind:
1. Clean Regularly
Regular cleaning is essential to keep the rear window looking clear and free from dirt, dust, and debris. Use a mild detergent or specialized cleaner designed for automotive windows. Avoid using harsh chemicals or abrasive materials that could scratch or damage the window surface. Wipe the window gently with a soft cloth or sponge, and rinse thoroughly with clean water.
2. Inspect for Any Damage
Periodically inspect the rear window for any signs of damage, such as cracks or chips. These should be addressed immediately to prevent further deterioration and potential leaks. If you notice any damage, consider seeking professional help to repair or replace the window.
Additionally, be mindful of any discoloration or hazing on the surface of the rear window. This could be an indication of long-term wear and may require further attention.
By following these maintenance tips, you can help prolong the lifespan of your new rear window and ensure its optimal performance for years to come.
Q&A:
What can cause the rear window of a BMW Z3 to break?
The rear window of a BMW Z3 can break due to various reasons, including impact from objects, extreme temperature changes, manufacturing defects, or prolonged exposure to sunlight.
Is it possible to replace the rear window of a BMW Z3 by myself?
Yes, it is possible to replace the rear window of a BMW Z3 by yourself, but it requires some technical skills and knowledge of the car’s structure. It is recommended to consult the car’s manual or seek professional help to ensure the proper installation.
How much does it cost to replace the rear window of a BMW Z3?
The cost of replacing the rear window of a BMW Z3 can vary depending on several factors, such as the quality of the replacement window, labor costs, and the location of the repair shop. On average, it can cost between $500 to $1000 or more.